### -----------------------------------------------------------------
### Written by Matt Brown
###
### Description: Test VMWare Host Networks
###
### Requires:
###   VMWare Snapin
###   Test VM with a Local Admin Account, may need to turn UAC Off
###   CSV File with Network Info
###
### Sample CSV File:
###     Name,VLanId,ip,netmask,gateway
###     VM-Subnet01,21,192.168.3.5,255.255.255.0,192.168.3.1
###     VM-Subnet02,22,192.168.4.5,255.255.255.0,192.168.3.5
### -----------------------------------------------------------------

## Load VMWare Snapin
if(-not (Get-PSSnapin | where { $_.Name -match 'VMware.VimAutomation.Core' })) {
 Add-PSsnapin VMware.VimAutomation.Core
}

## Vars to Configure
$vCenterServer = "VC.domain.com"
$clusterToTest = "ProductionCluster"
$TestMachine = "TestVM"
$vmnicname = "Local Area Connection"
$NetworkListFile = "VMNetworkTestList.csv"


function TestNetwork($currenthost,$newhost,$vm,$gateway,$guestCred) {

 if($currenthost -notmatch $newhost) {
  Write-Host ("Moving $TestMachine to " + $_.Name) -ForegroundColor Cyan
  $VM | Move-VM -Destination $_.Name | Out-Null
 }
 $script = ("ping " + $gateway)
 Write-Host $script -ForegroundColor Yellow
 $pingtest = Invoke-VMScript -VM $vm -ScriptText $script -scriptType bat -Credential $guestCred
 if($pingtest.ScriptOutput -match "(0% loss)") { Write-Host "Test Success" -ForegroundColor Green } else { $pingtest.ScriptOutput }
 #$continue = Read-Host "Hit Enter to Test on Next Host."
 return $newhost
}

## Connect to vCenter and grab information
Connect-VIServer -Server $vCenterServer -credential (Get-Credential -Message ("vCenter Account"))
$hosts = Get-VMHost -Location $clusterToTest | select Name
$VM = get-vm -name $TestMachine
$currenthost = $vm.VMHost.Name

$guestCred = Get-Credential -UserName ($TestMachine + "\") -Message "Local Admin Account"

$NetworksToTest = Import-Csv $NetworkListFile
$NetworksToTest | foreach {
 $NetworkName = $_.Name
 $IP = $_.ip
 $gateway = $_.gateway
 $netmask = $_.netmask

 Write-Host "Changing Network on $TestMachine to $NetworkName" -ForegroundColor Cyan
 Get-NetworkAdapter -VM $vm | Set-NetworkAdapter -NetworkName $NetworkName -Confirm:$false | Out-Null
 #$continue = Read-Host "Hit Enter to Set the IP Address."

 Write-Host "Changing IP Address on $TestMachine to $IP" -ForegroundColor Cyan
 $VM | Get-VMGuestNetworkInterface -GuestCredential $guestCred | Where-Object { $_.Name -eq $vmnicname } | Set-VMGuestNetworkInterface -GuestCredential $guestCred -Ip $IP -Netmask $netmask -Gateway $gateway | Out-Null
 #$continue = Read-Host "Hit Enter to Run Ping Tests."

 $x = @()
 $hosts | where { $_ -notmatch $currenthost } | foreach { $x += $_.Name }
 $currenthost = TestNetwork $currenthost $currenthost $vm $gateway $guestCred
 $hosts | foreach {
  $currenthost = TestNetwork $currenthost $_ $vm $gateway $guestCred
 }
}
Showing posts with label VM Networking. Show all posts
Showing posts with label VM Networking. Show all posts
Friday, November 7, 2014
Powershell: Test VMWare Host Networks
Here's a handy script I use to verify networks on my VMWare Clusters. This script takes a test VM and changes the Network and IP Address from a list, then does a simple ping from the VM on each host to let you know your networks are working correctly before moving Production Machines to it. The need for this spawned from a missing "allowed vLan id" not being configured across the ether channel ports on one of the hosts.


Thursday, February 12, 2009
NetApp 3040a Clustered Link Aggregation - vif
I've got (2) NetApp 3040a clustered systems both running LACP Aggregated vifs (nics) for my NFS VMWare Connections. One cluster is running on Cisco Catlyist 3750's and the other is running on a Cisco Catlyist 4507. Both switches are setup redundantly. The fail over / load balance is excellent. Here's how I set it up:
My switches are set to IP Load Balance (global switch setting)
Commands I used to setup the nics on the NetApp. This puts onboard nic c and d and add on card port c and d in an aggregated LACP vif called SANAprivate. I use this for private NFS traffic for my VMWare ESX Hosts. The next command sets the IP Address info and adds the partner vif for cluster failovers / non-disruptive SAN upgrades.
> vif create lacp SANAprivate -b ip e0c e0d e4c e4d
> ifconfig SANAprivate 192.168.217.11 up netmask 255.255.255.0 broadcast 192.168.217.255 -wins mediatype auto trusted partner SANBprivate
> vif status SANAprivate
default: transmit 'IP Load balancing', VIF Type 'multi_mode', fail 'log'
private: 4 links, transmit 'IP Load balancing', VIF Type 'lacp' fail 'default'
VIF Status Up Addr_set
up:
e4d: state up, since 30Jan2009 07:47:56 (7+08:17:02)
mediatype: auto-1000t-fd-up
flags: enabled
active aggr, aggr port: e0d
input packets 8106183, input bytes 9157734620
input lacp packets 22869, output lacp packets 21163
output packets 502026, output bytes 229370476
up indications 2, broken indications 0
drops (if) 0, drops (link) 0
indication: up at 30Jan2009 07:47:56
consecutive 0, transitions 2
e4c: state up, since 30Jan2009 07:47:54 (7+08:17:04)
mediatype: auto-1000t-fd-up
flags: enabled
active aggr, aggr port: e0d
input packets 912352, input bytes 82064164
input lacp packets 22874, output lacp packets 21162
output packets 4173173, output bytes 1334844804
up indications 2, broken indications 0
drops (if) 0, drops (link) 0
indication: up at 30Jan2009 07:47:54
consecutive 0, transitions 2
e0c: state up, since 30Jan2009 07:47:53 (7+08:17:05)
mediatype: auto-1000t-fd-up
flags: enabled
active aggr, aggr port: e0d
input packets 2356250, input bytes 569112124
input lacp packets 22857, output lacp packets 21160
output packets 873913, output bytes 121767134
up indications 2, broken indications 0
drops (if) 0, drops (link) 0
indication: up at 30Jan2009 07:47:53
consecutive 0, transitions 2
e0d: state up, since 30Jan2009 07:47:53 (7+08:17:05)
mediatype: auto-1000t-fd-up
flags: enabled
active aggr, aggr port: e0d
input packets 3886952, input bytes 2231755682
input lacp packets 22877, output lacp packets 21160
output packets 1772975, output bytes 1653703494
up indications 2, broken indications 0
drops (if) 0, drops (link) 0
indication: up at 30Jan2009 07:47:53
consecutive 0, transitions 2
Cisco Switch Config
We tested this by pulling Cables from each of the 4 nics up to 3 at a time, so each nic would be by itself and with other nics while pulling data from the link aggregation. We setup multiple connections so we were pulling more than 1 nics worth of bandwidth. I have had very good results with this configuration and have not seen any issues with teaming the onboard nics and the addon nics.
interface Port-channel10
description NetApp Filer Public Links
switchport
switchport access vlan 463
switchport mode access
!
interface GigabitEthernet1/1
description stfSan-e0a
switchport access vlan 463
switchport mode access
channel-group 10 mode active
!
interface GigabitEthernet1/2
description stfSan-e4a
switchport access vlan 463
switchport mode access
channel-group 10 mode active
!
interface GigabitEthernet2/1
description stfSan-e0b
switchport access vlan 463
switchport mode access
channel-group 10 mode active
!
interface GigabitEthernet2/2
description stfSan-e4b
switchport access vlan 463
switchport mode access
channel-group 10 mode active
!
My switches are set to IP Load Balance (global switch setting)
Commands I used to setup the nics on the NetApp. This puts onboard nic c and d and add on card port c and d in an aggregated LACP vif called SANAprivate. I use this for private NFS traffic for my VMWare ESX Hosts. The next command sets the IP Address info and adds the partner vif for cluster failovers / non-disruptive SAN upgrades.
> vif create lacp SANAprivate -b ip e0c e0d e4c e4d
> ifconfig SANAprivate 192.168.217.11 up netmask 255.255.255.0 broadcast 192.168.217.255 -wins mediatype auto trusted partner SANBprivate
> vif status SANAprivate
default: transmit 'IP Load balancing', VIF Type 'multi_mode', fail 'log'
private: 4 links, transmit 'IP Load balancing', VIF Type 'lacp' fail 'default'
VIF Status Up Addr_set
up:
e4d: state up, since 30Jan2009 07:47:56 (7+08:17:02)
mediatype: auto-1000t-fd-up
flags: enabled
active aggr, aggr port: e0d
input packets 8106183, input bytes 9157734620
input lacp packets 22869, output lacp packets 21163
output packets 502026, output bytes 229370476
up indications 2, broken indications 0
drops (if) 0, drops (link) 0
indication: up at 30Jan2009 07:47:56
consecutive 0, transitions 2
e4c: state up, since 30Jan2009 07:47:54 (7+08:17:04)
mediatype: auto-1000t-fd-up
flags: enabled
active aggr, aggr port: e0d
input packets 912352, input bytes 82064164
input lacp packets 22874, output lacp packets 21162
output packets 4173173, output bytes 1334844804
up indications 2, broken indications 0
drops (if) 0, drops (link) 0
indication: up at 30Jan2009 07:47:54
consecutive 0, transitions 2
e0c: state up, since 30Jan2009 07:47:53 (7+08:17:05)
mediatype: auto-1000t-fd-up
flags: enabled
active aggr, aggr port: e0d
input packets 2356250, input bytes 569112124
input lacp packets 22857, output lacp packets 21160
output packets 873913, output bytes 121767134
up indications 2, broken indications 0
drops (if) 0, drops (link) 0
indication: up at 30Jan2009 07:47:53
consecutive 0, transitions 2
e0d: state up, since 30Jan2009 07:47:53 (7+08:17:05)
mediatype: auto-1000t-fd-up
flags: enabled
active aggr, aggr port: e0d
input packets 3886952, input bytes 2231755682
input lacp packets 22877, output lacp packets 21160
output packets 1772975, output bytes 1653703494
up indications 2, broken indications 0
drops (if) 0, drops (link) 0
indication: up at 30Jan2009 07:47:53
consecutive 0, transitions 2
Cisco Switch Config
We tested this by pulling Cables from each of the 4 nics up to 3 at a time, so each nic would be by itself and with other nics while pulling data from the link aggregation. We setup multiple connections so we were pulling more than 1 nics worth of bandwidth. I have had very good results with this configuration and have not seen any issues with teaming the onboard nics and the addon nics.
interface Port-channel10
description NetApp Filer Public Links
switchport
switchport access vlan 463
switchport mode access
!
interface GigabitEthernet1/1
description stfSan-e0a
switchport access vlan 463
switchport mode access
channel-group 10 mode active
!
interface GigabitEthernet1/2
description stfSan-e4a
switchport access vlan 463
switchport mode access
channel-group 10 mode active
!
interface GigabitEthernet2/1
description stfSan-e0b
switchport access vlan 463
switchport mode access
channel-group 10 mode active
!
interface GigabitEthernet2/2
description stfSan-e4b
switchport access vlan 463
switchport mode access
channel-group 10 mode active
!
Wednesday, September 24, 2008
VMWare ESX VM Network Aggregation / EtherChannel / LACP
I recently went through a series of tests with our VMWare ESX 3.5 environment to test link aggregation and failover. We tested a variety of Link aggregation methods including LACP, PgaP, and standard etherchannel while experimenting with different settings on the vSwitch.
Here's what the lab consisted of: a Dell R900 with 8 physical nics (3 used for the test), a Cisco 4507 Switch with 2 Gig high speed blades, 2 laptops and 3 Virtual Machines. This would also work on 2 cisco 3750's connected with a stackwise cable. We setup a virtual switch on the ESX Server that was just for Virtual Machine networks with 3 pnics. Our ports are set for trunk mode so we can have multiple vlan's on our VM's. We setup a ping from each of the Virtual Machines to one of the laptops with a command like: "ping 10.0.0.100 -t -w 500" and setup the same from the 2 laptops back to the virtual machines. This way we could see how many packets we lost on each setting change when unplugging a cable from the switch or taking a blade offline.
After quite a bit of testing we found Standard Etherchannel to work the best. With a standard etherchannel setup we would loose between 1 and 3 packets (at the faster retry time) if a network cable or switch blade was brought offline. In my opinion, this was an acceptable behavior, although I would like to see an LACP aggregation running.
Here's what our final configuration looked like:
VMWare ESX vSwitch Configuration: (under vSwitch Properties->Nic Teaming)
Load Balancing: Route based on IP Hash
Network Failover Detection: Link Status Only
(this could be beacon probing depending on your network)
Notify Switches: Yes
Failback: Yes

Switch Config (Cisco 4507 or 3750)
# Set Switch load balance to IP
port-channel load-balance src-dst-ip
# Add port 1/2 to group
interface GigabitEthernet1/2
switchport mode trunk
channel-group 1 mode on
# Add port 2/1 to group
interface GigabitEthernet2/1
switchport mode trunk
channel-group 1 mode on
# Add port 2/2 to group
interface GigabitEthernet2/2
switchport mode trunk
channel-group 1 mode on
# Setup Port Channel Group
interface Port-channel1
switchport switchport mode trunk
spanning-tree portfast trunk
Here's what the lab consisted of: a Dell R900 with 8 physical nics (3 used for the test), a Cisco 4507 Switch with 2 Gig high speed blades, 2 laptops and 3 Virtual Machines. This would also work on 2 cisco 3750's connected with a stackwise cable. We setup a virtual switch on the ESX Server that was just for Virtual Machine networks with 3 pnics. Our ports are set for trunk mode so we can have multiple vlan's on our VM's. We setup a ping from each of the Virtual Machines to one of the laptops with a command like: "ping 10.0.0.100 -t -w 500" and setup the same from the 2 laptops back to the virtual machines. This way we could see how many packets we lost on each setting change when unplugging a cable from the switch or taking a blade offline.
After quite a bit of testing we found Standard Etherchannel to work the best. With a standard etherchannel setup we would loose between 1 and 3 packets (at the faster retry time) if a network cable or switch blade was brought offline. In my opinion, this was an acceptable behavior, although I would like to see an LACP aggregation running.
Here's what our final configuration looked like:
VMWare ESX vSwitch Configuration: (under vSwitch Properties->Nic Teaming)
Load Balancing: Route based on IP Hash
Network Failover Detection: Link Status Only
(this could be beacon probing depending on your network)
Notify Switches: Yes
Failback: Yes

Switch Config (Cisco 4507 or 3750)
# Set Switch load balance to IP
port-channel load-balance src-dst-ip
# Add port 1/2 to group
interface GigabitEthernet1/2
switchport mode trunk
channel-group 1 mode on
# Add port 2/1 to group
interface GigabitEthernet2/1
switchport mode trunk
channel-group 1 mode on
# Add port 2/2 to group
interface GigabitEthernet2/2
switchport mode trunk
channel-group 1 mode on
# Setup Port Channel Group
interface Port-channel1
switchport switchport mode trunk
spanning-tree portfast trunk
Monday, June 23, 2008
Numbering of VMWare nics
I was surprised to find out after installing VMWare ESX 3.5 on one of our 4 new Dell R900s that the numbering of my nics was dependent on which one we chose to setup up the Service Console on and that the rest of the nics would get an interrupted numbering depending on where nic0 was located. After a little poking around I figured out you can reset this numbering by editing the following file: > /etc/vmware/esx.conf from the command line. I used vi. I also recommend backing this file up (> cp esx.conf esx.conf.bak) before you try editing it because it is essential to ESX.
if you open this file and scroll about half way down you will see the numbering of you nics. Here's what one of mine looked like. You can see that nic0 ended up somewhere in the middle instead of the first port on my on board card like I wanted.
 All you have to do it go through and change the names of the ports to the nic number you want. Save the file and reboot the ESX Server. This is faster than re-installing ESX, especially if you have done any configs on the system.
You can verify your nics by typing: esxcfg-nics –l
if you open this file and scroll about half way down you will see the numbering of you nics. Here's what one of mine looked like. You can see that nic0 ended up somewhere in the middle instead of the first port on my on board card like I wanted.
 All you have to do it go through and change the names of the ports to the nic number you want. Save the file and reboot the ESX Server. This is faster than re-installing ESX, especially if you have done any configs on the system.
You can verify your nics by typing: esxcfg-nics –l
Saturday, June 21, 2008
Recommended Network setup for VMWare ESX
Here's what I recommend for Network setup for VMWare ESX. ESX Servers should have a minimum of 6 network ports, preferably 8. As you can see from the screen shot below I like to configure 3 nics for my VM Network and my Service Console. I put these on the same vSwitch and have the ports configured for vlan trunking (in a 6 port setup I would give this vSwitch 2 nics). I then setup 2 nics for vMotion traffic (this is preferably on a separate network or vlan). I also like to use NFS for my Virtual Machines and so I setup another 3 nics for NFS Traffic. I keep this on a private vlan that has no gateway and have my NetApp NAS on the same private network. This keeps my NFS traffic secure and tight.
Another thing to note here is that each of these vSwitch configuration contains a physical network port located on a different network card and each of those are routed to a different physical switch. The idea here is we get the maximum amount of availability and reliability of the network. You can also run a esxcfg-vswitch -l command from your ESX console to view your configuration.
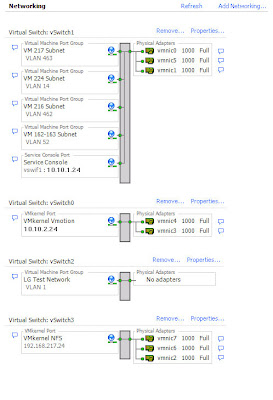
You will also notice I have a vSwitch created with no Physical Adapters in it. I setup this with a vLan ID of 1 and then either add a VM with DNS or manually give all the machines in the group an ip in the same range such as 192.168.0.5 / 255.255.255.0. With this setup, you have to remember to keep all the VM's you want to talk with each other on the same ESX Server so they can talk to each other.
This is a great way to take a copy of a Domain Controller and a few Client systems and put them in a test bubble without having to change anything on the DC besides the networking. I use this setup to test changes to my Domains or web servers without touching the production systems until I've thoroughly tested.
Another thing to note here is that each of these vSwitch configuration contains a physical network port located on a different network card and each of those are routed to a different physical switch. The idea here is we get the maximum amount of availability and reliability of the network. You can also run a esxcfg-vswitch -l command from your ESX console to view your configuration.

You will also notice I have a vSwitch created with no Physical Adapters in it. I setup this with a vLan ID of 1 and then either add a VM with DNS or manually give all the machines in the group an ip in the same range such as 192.168.0.5 / 255.255.255.0. With this setup, you have to remember to keep all the VM's you want to talk with each other on the same ESX Server so they can talk to each other.
This is a great way to take a copy of a Domain Controller and a few Client systems and put them in a test bubble without having to change anything on the DC besides the networking. I use this setup to test changes to my Domains or web servers without touching the production systems until I've thoroughly tested.
Monday, March 31, 2008
VMWare ESX: Host %esxhost% has no management network redundancy
After my upgrade to ESX 3.5 and Virtual Center 2.5 I started seeing a Cluster Configuration Issue of "Host ESXHost currently has no management network redundancy". Apparently VMWare HA reports a configuration warning when it detects that there is no redundancy for the Service Console. After a little research I discovered that adding another Service Console Port on a different nic would solve the problem. My ESX Boxes have 4 cards in them so this was a pretty easy fix. I have my Host networking setup so vmnic0 and vmnic2 go into switch A and vmnic1 and vmnic3 go into switch B on my network.
Here's what my Network config looked like before the update: And here's what it looks like after the update:
 As you can see... I simply added another Service Console Port on vSwitch2. After adding the additional Service Console Port I also had to reconfigure HA for each ESX Host I made the change on to get the error to go away. I'm still trying to decide if I should create a second VMKernal Port as well.
Here's what my Network config looked like before the update:
 And here's what it looks like after the update:
 As you can see... I simply added another Service Console Port on vSwitch2. After adding the additional Service Console Port I also had to reconfigure HA for each ESX Host I made the change on to get the error to go away. I'm still trying to decide if I should create a second VMKernal Port as well.
Subscribe to:
Posts (Atom)