Monday, June 30, 2008

VMWare 64bit Virtual Machine Error

Seen this error?
Host CPU is incompatible with the virtual machine's requirements at CPUID


There is a pretty easy fix to this error if your host CPU's are indeed 64bit. If not your out of luck.

Simply boot into your BIOS and look in the CPU options. There should be a setting for enabling virtulization technology. Reboot and you should be good to go.

SSH on VMWare ESX 3.5

I use ssh all the time as it can really help when checking settings or getting to one of the ESX Servers from my office without having to walk over to the datacenter (across campus).

By default SSH access for the root user is disabled. Which also means SCP access is not available.

Here's the quick run down:
  1. Login to the ESX Console as root
  2. Type # vi /etc/ssh/sshd_config from the cmd prompt
  3. Scroll down the file until you see: PermitRootLogin: no
  4. Scroll over to the start of the no, hit delete 3 times.
  5. Hit :i to enter into insert mode, then type yes
  6. Hit esc to get out of insert mode, then type :wq and hit enter to save the changes.
  7. Type # grep ‘PermitRootLogin’ /etc/ssh/sshd_config to verify the change was made.
Once your file is save you just need to restart the ssh service. To do this type # service sshd restart and the command prompt.

Your best to put a firewall rule on the service console port of your ESX server only allowing access from a few management workstations. I use putty and winSCP to ssh into my ESX Servers. Putty to get to the console and winSCP to transfer ISO images to my NFS share on the NAS.

Wednesday, June 25, 2008

Roaming Profiles... just not in the computer labs - part 2

I just figured out a way to have dynamic roaming profiles. Works perfect with both Active Directory on Windows Server 2003 and AD on Windows Server 2008.

Say we have a user bob. Here are three senarios for bob:
  • Senario #1: When bob logs into a computer in his office computer we want him to get his roaming profile that has to do with his job.
  • Senario #2: When bob logs into a computer in the Computer Sciense department we want him to get his roaming profile that has specific user settings for programming and coding softare.
  • Senario #3: When bob logs into a computer in the General Access Computer Labs we want him to get a generic profile optimized for the lab system.
Here's our solution:
AD Setting: Bob's user account in Active Directory has a the profile path box set to %profilepath%.
  1. In Senario #1 above, all the computers in bobs department have a System Enviorment variable set of profilepath=\\servershare\profiles\%username%

  2. In Senario #2 above, all the computers in the Computer Science department have a System Enviorment variable set of profilepath=\\computerscience\profiles\%username%

  3. In Senario #3 above, all the computers in the General Access Computer Lab are in an OU in Active Directory that have the following Group Policy applied to them: Computer Configuration \ Policies \ Administrative Templates \ System \ User Profiles \ Only allow local user profiles = enabled ). What this does is forces the system to use the default profile on the Lab machine. When we build the image for our lab machines we setup the profile exactly like we want it and then log in with an admin account and using the profile tool under Computer Properties we copy the model profile over the top of the default User folder (hidden folder in documents and settings). Now every user that logs into the lab gets the same experiance. We also use a product called DeepFreeze, that sets the system back to original image state after every reboot.

Tuesday, June 24, 2008

Roaming Profiles... just not in the computer labs.

We recently needed to find a way to allow for roaming profiles with our Active Directory Domain for a certain group of users. This caused a problem for our Computer labs because we didn't want the profiles to roam in the labs as we were wanting every user to get the same experience in the labs and be given the pre-configured profile.

There are 2 options depending on the type of computers you have on your domain in the lab enviorment. Put all the computers in an OU and add a group policy to them. Is under this tree:
(Computer Configuration \ Policies \ Administrative Templates \ System \ User Profiles)

For Windows XP enable the following:
- Only allow local user profiles

For Windows Vista you can change the profile value:
- Set roaming profile path for all users ( you could carfully set it to a local folder)


This works great and allows both the use of roaming profiles in the office environment while still letting the Lab machines be configured for maximum performance. Also, if you use DeepFreeze or a similar product I'd recommend disabling machine password changes through Group Policy so your systems don't suddenly drop off the Domain.

Monday, June 23, 2008

Numbering of VMWare nics

I was surprised to find out after installing VMWare ESX 3.5 on one of our 4 new Dell R900s that the numbering of my nics was dependent on which one we chose to setup up the Service Console on and that the rest of the nics would get an interrupted numbering depending on where nic0 was located. After a little poking around I figured out you can reset this numbering by editing the following file: > /etc/vmware/esx.conf from the command line. I used vi. I also recommend backing this file up (> cp esx.conf esx.conf.bak) before you try editing it because it is essential to ESX.

if you open this file and scroll about half way down you will see the numbering of you nics. Here's what one of mine looked like. You can see that nic0 ended up somewhere in the middle instead of the first port on my on board card like I wanted.

All you have to do it go through and change the names of the ports to the nic number you want. Save the file and reboot the ESX Server. This is faster than re-installing ESX, especially if you have done any configs on the system.

You can verify your nics by typing: esxcfg-nics –l

Sunday, June 22, 2008

IIS Scripted Site Creation

Management of Microsoft Internet Information Services (IIS) can easily be scripted and even setup as part of automated system. If you look in c:\inetpub\adminscripts\ you will find a utility called adsutil.vbs.

If you run this in a dos command window you can quickly create a virtual directory with a command as simple as:
cscript c:\inetpub\adminscripts\adsutil.vbs CREATE_VDIR w3svc/1/root/
or set the root path for a site with:
cscript c:\inetpub\adminscripts\adsutil.vbs set w3svc/1/root/%1/path "\\sites\users\bob"

I run my automated website creation through some python scripts that kick off dos batch scripts like the sample below. This one below gets the date, creates a log file, mounts the user share, creates the folder if it doesn't exsits, creates the IIS virtual directory and then sets the virtual directory's path to the network share.
Here's the Script (possible wrapping):
---------------------------------------------------
@echo off

rem -------------------------------------------------
rem -- Set %mmdd% varible to the current month_day --
rem -------------------------------------------------
set mmdd=%date:~4,2%_%date:~7,2%

rem -------------------------------------------------
rem -- Set Log File Name / output info to log file --
rem -------------------------------------------------
set myfile=c:\webscripts\DailyLog\WebsiteLog-%mmdd%.txt
echo Creating Folder for %1 >>%myfile%

rem -------------------------------------------------
rem -- Map Drive / Create Folder / Set Permissions --
rem -------------------------------------------------
if exist z:\. goto Mounted
net use z: "\\sites\usershare" >>%myfile%
:Mounted
if exist z:\users\%1 goto Created
mkdir z:\users\%1 >>%myfile%
:Created
echo skip
fileacl z:\users\%1 /G %1:RrRaReWaXWeADcpPWw /D %1:D /s IIS_WEB_USER:RX /PROTECT >>%myfile%

rem -------------------------------------------------
rem -- Create Virtual Dir in IIS / Change its path --
rem -------------------------------------------------
cscript c:\inetpub\adminscripts\adsutil.vbs CREATE_VDIR w3svc/1/root/%1 >>%myfile%
cscript c:\inetpub\adminscripts\adsutil.vbs set w3svc/1/root/%1/path "\\sites\users\"%1 >>%myfile%

---------------------------------------------------

Saturday, June 21, 2008

Recommended Network setup for VMWare ESX

Here's what I recommend for Network setup for VMWare ESX. ESX Servers should have a minimum of 6 network ports, preferably 8. As you can see from the screen shot below I like to configure 3 nics for my VM Network and my Service Console. I put these on the same vSwitch and have the ports configured for vlan trunking (in a 6 port setup I would give this vSwitch 2 nics). I then setup 2 nics for vMotion traffic (this is preferably on a separate network or vlan). I also like to use NFS for my Virtual Machines and so I setup another 3 nics for NFS Traffic. I keep this on a private vlan that has no gateway and have my NetApp NAS on the same private network. This keeps my NFS traffic secure and tight.

Another thing to note here is that each of these vSwitch configuration contains a physical network port located on a different network card and each of those are routed to a different physical switch. The idea here is we get the maximum amount of availability and reliability of the network. You can also run a esxcfg-vswitch -l command from your ESX console to view your configuration.


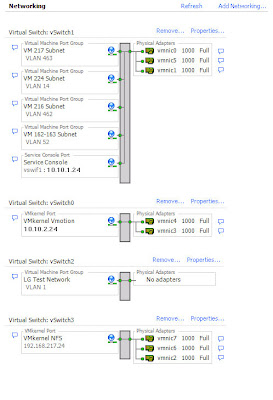
You will also notice I have a vSwitch created with no Physical Adapters in it. I setup this with a vLan ID of 1 and then either add a VM with DNS or manually give all the machines in the group an ip in the same range such as 192.168.0.5 / 255.255.255.0. With this setup, you have to remember to keep all the VM's you want to talk with each other on the same ESX Server so they can talk to each other.

This is a great way to take a copy of a Domain Controller and a few Client systems and put them in a test bubble without having to change anything on the DC besides the networking. I use this setup to test changes to my Domains or web servers without touching the production systems until I've thoroughly tested.