###===========================
### Pause Program for 15 min
### - Matt Brown, 2008
###===========================
$x = 15*60
$length = $x / 100
while($x -gt 0) {
  $min = [int](([string]($x/60)).split('.')[0])
  $text = " " + $min + " minutes " + ($x % 60) + " seconds left"
  Write-Progress "Pausing Script" -status $text -perc ($x/$length)
  start-sleep -s 1
  $x--
}
Tuesday, November 11, 2008
Powershell Progress Bar with Time Countdown
I needed to add a 15 minute pause in a script that we were using to create exchange mailboxes and this little Powershell progress bar with a countdown timer worked really nice.
Thursday, November 6, 2008
Powershell: Monitor IIS Application Pool or Site
We have an exchange IIS Application Pool stopping every so often because of some Entourage client problems. It would cause the Application Pool to stop and therefore break owa access, which was a problem.
So while we are working with Microsoft on a permanent solution I quickly put together a powershell script to run every 30 seconds and check the state of the application pool. If the MSExchangeOWAAppPool is stopped, then the script starts it. It uses the IIS Provider Tools snapin for powershell.
So while we are working with Microsoft on a permanent solution I quickly put together a powershell script to run every 30 seconds and check the state of the application pool. If the MSExchangeOWAAppPool is stopped, then the script starts it. It uses the IIS Provider Tools snapin for powershell.
### -----------------------------------------------
### Written by Matt Brown - 12:46 PM 11/3/2008
### Powershell script to check MSExchangeOWAAppPool
### Requires IIS Administration Provider Tools
### -----------------------------------------------

### Make sure Snapin is loaded
$add = 1
get-PSSnapin * | foreach {
 if($_.Name -match 'IIsProviderSnapIn') {
  $add = 0
 }
}
if($add) {
 add-PSSnapin IIsProviderSnapIn
}

#######################################
######## Check AppPool State ##########
#######################################
Write-Host "`n"
Write-Host "#####################################"
Write-Host "Running check on MSExchangeOWAAppPool"
Write-Host "#####################################"
while($true) {

 $state = Get-WebItemState IIS:\AppPools\MSExchangeOWAAppPool
 if($state -eq "Stopped") {
  Start-WebItem IIS:\AppPools\MSExchangeOWAAppPool
  $now = Get-Date –f "yyyy-MM-dd HH:mm:ss"
  $MsgBody = "CAS01 AppPool needed a restart " + $now
  Write-Host $MsgBody
 }
 Start-Sleep -s 30
}
Wednesday, November 5, 2008
Powershell: New Active Directory Objects Report
Here's a quick Powershell script to send you a report of the most recent additions to Active Directory.
### --------------------------------------------
### Written by Matt Brown - 12:13 PM 10/22/2008
###
### AD Report on new objects created in the
### last 24 hours
### Requires Quest Powershell extenstions for AD
### --------------------------------------------

#######################################
####### Load Required Snapin's ########
#######################################
## Add Quest AD Snapin Tool
$addAD = 1
get-PSSnapin * | foreach {
  if($_.Name -match 'quest.activeroles.admanagement') {
    $addAD = 0
  }
}
if($addAD) { add-PSSnapin quest.activeroles.admanagement }

#######################################
########### Setup Log File ############
#######################################
$Today=get-date
$filename="NewADObjects_"+($Today.year).ToString()+"_"
$filename+=($Today.month).ToString()+"_"+($Today.day).ToString()+".txt"

#######################################
### Get AD Formated Date 24 hrs ago ###
#######################################
$currentDate = [System.DateTime]::Now
$currentDateUtc = $currentDate.ToUniversalTime()
$creationDate = $currentDateUtc.AddHours(- 24)
$YYYY = $creationDate.Year.ToString()
$MM = $creationDate.Month.ToString();
if ($MM.Length -eq 1) {$MM="0" + $MM};
$DD = $creationDate.Day.ToString();
if ($DD.Length -eq 1) {$DD="0" + $DD};
$creationDateStr = $YYYY + $MM + $DD + '000000.0Z'

$MsgBody = "###################`n"
$MsgBody += " New AD Objects`n"
$MsgBody += "###################`n`n"

write-host $creationDateStr
$newobjects = Get-QADObject -ldapfilter "(whenCreated>=$creationDateStr)"
                -SizeLimit 30000 | sort type

if($newobjects) {
  $newobjects | out-file $filename
  $type = ""
  $newobjects | foreach {
    if($_.Type -eq $type) {
      $MsgBody += " " + $_.Name + "`n"
    } else {
      $type = $_.Type
      $MsgBody += "`nNew " + $_.Type + "(s)`n"
      $MsgBody += "===================================`n"
      $MsgBody += " " + $_.Name + "`n"
    }
  }
}

#######################################
############ Email Report #############
#######################################

function SendEmail($body) {
  $message = New-Object System.Net.Mail.MailMessage
  $message.From = "myemail@domain.com"
  $message.To.Add("myeamail@domain.com")
  $message.Subject = "Active Directory - new object report"
  $message.Body = $body

  $smtp = New-Object System.net.Mail.SmtpClient
  $smtp.Host = "smtp.mailserver.com"
  $smtp.UseDefaultCredentials = $true
  $smtp.Send($message)
}

SendEmail($MsgBody)
Tuesday, November 4, 2008
Update GAL Display Name - powershell
We recently decided to change on how our Global Address list is displayed from using the format to the , format.
Powershell made quick work of this task and took about 10 minutes with 2500 users. Here's the script.
Don't forget to update the OAB after this is done so your outlook clients will update.
Powershell made quick work of this task and took about 10 minutes with 2500 users. Here's the script.
###=====================================
### Update Exchange Global Address List Display
### - Matt Brown, 2008
###=====================================
$Users = Get-User -ResultSize unlimited |
 where {
   ($_.RecipientTypeDetails -eq "MailUser")
   -or ($_.RecipientTypeDetails -eq "UserMailbox")
 }

ForEach ($Person in $Users) {
   $NewName = $User.LastName + ", "
   $NewName += $User.FirstName + " "
   $NewName += $user.Initials

   # get rid of trailing spaces caused by blank initials
   $NewName = $NewName.Trim()
   Set-User $User -Name $NewName -DisplayName $NewName
   $NewName = $Null
}
Don't forget to update the OAB after this is done so your outlook clients will update.
Monday, November 3, 2008
Active Directory - Removing SID History
I use a couple of great tools from joeware.net to remove a SID from a users SID History. I had a problem where the wrong user was mapped over during a migration when we were colasping multiple domains into one.
The 2 tools I used from joeware were adfind and admod, both free.
adfind -h IT-DC01 -default -f sAMAccountName=jackuser sidhistory
dn:CN=Jack User,OU=Employees,OU=People,DC=mydomain,DC=edu
>sIDHistory: S-1-5-23-4189335451-1674751469-1023141700-3124
>sIDHistory: S-1-5-23-4217985222-169311000002009-1212232504-146495
This listed the current SID's in the history of the users account. After deciding which one I wanted to removie I used admod to remove it.
admod -b "CN=Jack User,OU=Employees,OU=People,DC=mydomain,DC=edu"
sidhistory:-:S-1-5-23-4217985222-1000002009-1212232504-146495
Sid Removed and now where ready to take that SID and add it to the correct user account.
admod -b "CN=Jackie User,OU=Employees,OU=People,DC=mydomain,DC=edu"
sidhistory:+:S-1-5-23-4217985222-1000002009-1212232504-146495
Note: I found out after this post that this option does not work with SIDHistory. You will need to use the VB Script or ADMT to migrate the sid from the source domain.
Sunday, November 2, 2008
VMWare over NFS on a NetApp - ASIS (deduplication) WOW
I have a NetApp 3040c cluster that I'm using for NFS, iSCSI and FC connectivity to my VMWare ESX Servers. NFS has proven to be fast and reliable. I'm running the following system on NFS without any problems:
sanb> df -s -g /vol/esxNFS
Filesystem used saved %saved
/vol/esxNFS/ 105GB 357GB 77%
I'll I can say is wow.
- Active Directory Domain Controller (Server 2008) - (16,000 users)
- Exchange 2007 (CAS) Client Access Server on Server 2008
- Exchange 2007 HUB on Server 2008
- ILM / MIIS on Server 2003
- IIS on Server 2003 with over 800 websites
- IIS on Server 2008
- Full Exchange 2007 Test enviorment (3 servers Mailbox, HUB, CAS and 1 DC)
- Blackberry Access Server
- Wireless Raidus Server
sanb> df -s -g /vol/esxNFS
Filesystem used saved %saved
/vol/esxNFS/ 105GB 357GB 77%
I'll I can say is wow.
ADMT Migrating Computers from 2003 to 2008
In order to migrate computers from a 2000 or 2003 Active Directory Domain to a 2008 Active Directory Domain you need to set a group policy in your 2008 domain that allows cryptography algorithms compatible with Windows NT 4.0. Otherwise, the migration will bring the computer account over but will not change the domain the computer is in.
You can find this Group Policy setting here:
In the Group Policy Management Editor console, expand Computer Configuration, expand Policies, expand Administrative Templates, expand System, click Net Logon, and then double-click Allow cryptography algorithms compatible with Windows NT 4.0. Based on (http://support.microsoft.com/kb/942564)
Another thing I found was that that Target Domain Account you are using to transfer the computers over need to have local admin privileges on the systems you are migrating from the source domain and the ADMT System needs to have access to the computer. (IE: Firewall opened for at least that machine).
Sunday, October 19, 2008
MySQL - find bad email addresses in database
I needed a quick way to find bad email addresses in my mysql database that was not being verified when the users entered them into the form. That will be the next fix.
A quick select using:
... and I had all the bad email addresses.
A quick select using:
SELECT name,email FROM `D_User` WHERE `email` NOT LIKE '%@%.%'
... and I had all the bad email addresses.
Wednesday, September 24, 2008
VMWare ESX VM Network Aggregation / EtherChannel / LACP
I recently went through a series of tests with our VMWare ESX 3.5 environment to test link aggregation and failover. We tested a variety of Link aggregation methods including LACP, PgaP, and standard etherchannel while experimenting with different settings on the vSwitch.
Here's what the lab consisted of: a Dell R900 with 8 physical nics (3 used for the test), a Cisco 4507 Switch with 2 Gig high speed blades, 2 laptops and 3 Virtual Machines. This would also work on 2 cisco 3750's connected with a stackwise cable. We setup a virtual switch on the ESX Server that was just for Virtual Machine networks with 3 pnics. Our ports are set for trunk mode so we can have multiple vlan's on our VM's. We setup a ping from each of the Virtual Machines to one of the laptops with a command like: "ping 10.0.0.100 -t -w 500" and setup the same from the 2 laptops back to the virtual machines. This way we could see how many packets we lost on each setting change when unplugging a cable from the switch or taking a blade offline.
After quite a bit of testing we found Standard Etherchannel to work the best. With a standard etherchannel setup we would loose between 1 and 3 packets (at the faster retry time) if a network cable or switch blade was brought offline. In my opinion, this was an acceptable behavior, although I would like to see an LACP aggregation running.
Here's what our final configuration looked like:
VMWare ESX vSwitch Configuration: (under vSwitch Properties->Nic Teaming)
Load Balancing: Route based on IP Hash
Network Failover Detection: Link Status Only
(this could be beacon probing depending on your network)
Notify Switches: Yes
Failback: Yes

Switch Config (Cisco 4507 or 3750)
# Set Switch load balance to IP
port-channel load-balance src-dst-ip
# Add port 1/2 to group
interface GigabitEthernet1/2
switchport mode trunk
channel-group 1 mode on
# Add port 2/1 to group
interface GigabitEthernet2/1
switchport mode trunk
channel-group 1 mode on
# Add port 2/2 to group
interface GigabitEthernet2/2
switchport mode trunk
channel-group 1 mode on
# Setup Port Channel Group
interface Port-channel1
switchport switchport mode trunk
spanning-tree portfast trunk
Sunday, September 21, 2008
Active Directory Install - Server 2008
Here are my basic steps for an Active Directory Installation using Server 2008. This is of course after a clean install of Windows 2008 Server and running Windows updates. I also like to turn off IPv6 in the networking and create a changelog.txt file in the all users -> startup folder.
Step 1. Configure Network
--- Start configureNics.bat ---
REM *** Configure IP Address
netsh interface ip set address name="Local Area Connection" static 10.0.0.10 255.255.255.0 10.0.0.1 1
REM *** Configure DNS Server (Point to Domain Controller)
netsh interface ip set dns "Local Area Connection" static 10.0.0.10
REM *** Configure WINS Server
netsh interface ip set wins "Local Area Connection" static 10.0.0.9
--- end configureNics.bat ---
Step 2. Rename Server
I then rename the Server to the name of my DC, usually somthing like DC01 or IT-DC01 as I don't like to rename domain controllers after the domain has been created.
--- Start renamecomputer.bat ---
@ECHO OFF
REM - Matt Brown 2008
REM ---------------------------------------------------
REM Rename Domain Controller
REM ---------------------------------------------------
ECHO
ECHO Please set your new computer name:
SET /P newpcname=[New Computer Name]
ECHO Renaming computer from %computername% to %newpcname%
netdom.exe renamecomputer %computername% /newname:%newpcname% /FORCE /VERBOSE
--- END renamecomputer.bat ---
Step 3. Prep Domain Controller
--- START prepdc.bat ---
ECHO *** Install .NET Framework
ServerManagerCmd -i NET-Framework-Core
ECHO *** Install Local and Remote Administration Tools
ServerManagerCmd -i RSAT-ADDS
--- END prepdc.bat ---
Reboot Server
Step 4. Prep Domain Controller Part 2
--- START prepdc-part2.bat ---
ECHO *** Install Local and Remote Administration Tools
ServerManagerCmd -i RSAT-ADDC
ServerManagerCmd -i RSAT-ADLDS
ServerManagerCmd -i RSAT-DNS-Server
ServerManagerCmd -i RSAT-WINS
ServerManagerCmd -i GPMC
ServerManagerCmd -i PowerShell
ECHO *** Install DNS Role
ServerManagerCmd -i DNS
--- END prepdc-part2.bat ---
Step 5. Install DC
--- START InstallDC.bat (run from c:\)---
ECHO *** Install Active Directory Domain Services Role
ServerManagerCmd -i ADDS-Domain-Controller
DCPromo /Answer:"C:\ad_setup.txt"
--- END InstallDC.bat ---
--- START ad_setup.txt ---
[DCInstall]
; New forest promotion
ReplicaOrNewDomain=Domain
NewDomain=Forest
NewDomainDNSName=corp.com
ForestLevel=2
DomainNetbiosName=CORP
DomainLevel=2
InstallDNS=Yes
ConfirmGc=Yes
Sitename=MainSite-001
CreateDNSDelegation=No
DatabasePath="C:\Windows\NTDS"
LogPath="C:\Windows\NTDS"
SYSVOLPath="C:\Windows\SYSVOL"
; Set SafeModeAdminPassword to the correct value prior to using the unattend file
SafeModeAdminPassword=
; Run-time flags (optional)
; RebootOnCompletion=Yes
--- END ad_setup.txt ---
Reboot Server, you now have a functioning Domain Controller.
Wednesday, September 17, 2008
Create Active Directory Users with Powershell
Here's a quick little script I wrote to create users in Active Directory using Powershell and the Quest extensions for AD.
---- Start Script CreateUsers.ps1 ----
### -----------------------------------------------------------------
### Written by Matt Brown - 12:13 PM 9/17/2008
###
### Powershell script requires a text file with the following fields
### Name,sAMAccountName,First,Last
### Brad,Bradley.J.Pitt,Brad,Pitt
###
### Requires Quest Powershell extenstions for AD
### -----------------------------------------------------------------
# Open the File of User Names and Put it in the Pipeline
Import-Csv "NewAccounts.txt" |
# Loop Through the CSV File, creating accounts
Foreach {
# Set Vars
$StrName = $_.Name
$StrSAMAccountName = $_.sAMAccountName
$StrFirst = $_.First
$StrLast = $_.Last
# Send vars to screen (1 line below)
write-Host "Creating User Account: $StrSAMAccountName - $StrName - $StrFirst - $StrLast"
# Create Account (1 line below)
New-QADUser -ParentContainer "OU=NewAccounts,dc=mydomain,dc=com" -Name $StrName -FirstName $StrFirst -LastName $StrLast -SamAccountName $StrSAMAccountName -DisplayName $StrName -Description "Training Account." -UserPassword 'P@ssword' -UserPrincipalName "$StrSAMAccountName@domain.edu" | Enable-QADUser
}
---- End Script CreateUsers.ps1 ----
And below is the text file used to create the accounts. Run this using the Quest Powershell extensions for AD and you'll be good to go.
---- Start NewAccounts.txt ----
Name,sAMAccountName,First,Last
Brad,BradleyJamesPitt,Brad,Pitt
---- End NewAccounts.txt ----
Wednesday, July 2, 2008
Active Directory - Restore Deleted Item (AD)
I recently had to restore an object (user account) in Active Directory that was accidentally deleted. The AdRestore Tool makes this very easy and painless.
Download it here AdRestore:
http://technet.microsoft.com/en-us/sysinternals/bb963906.aspx
Once you download and install it... open up the cmd prompt and type in:
c:\> adrestore -r username
or
c:\> adrestore -r objectname
In my case I needed to restore a useraccount called mbrown. So I ran c:\adrestore -r mbrown the search returned 5 accounts that started with mbrown, I choose no to all but the one I wanted to restore, choose yes to the correct mbrown account and presto... the account was back in the original OU.
Afterwards, I did have to go in and refresh the OU and enable the account... but at least the SID was correct.
Monday, June 30, 2008
VMWare 64bit Virtual Machine Error
Seen this error?
Host CPU is incompatible with the virtual machine's requirements at CPUID

There is a pretty easy fix to this error if your host CPU's are indeed 64bit. If not your out of luck.
Simply boot into your BIOS and look in the CPU options. There should be a setting for enabling virtulization technology. Reboot and you should be good to go.

SSH on VMWare ESX 3.5
I use ssh all the time as it can really help when checking settings or getting to one of the ESX Servers from my office without having to walk over to the datacenter (across campus).
By default SSH access for the root user is disabled. Which also means SCP access is not available.
Here's the quick run down:
Your best to put a firewall rule on the service console port of your ESX server only allowing access from a few management workstations. I use putty and winSCP to ssh into my ESX Servers. Putty to get to the console and winSCP to transfer ISO images to my NFS share on the NAS.
By default SSH access for the root user is disabled. Which also means SCP access is not available.
Here's the quick run down:
- Login to the ESX Console as root
- Type # vi /etc/ssh/sshd_config from the cmd prompt
- Scroll down the file until you see: PermitRootLogin: no
- Scroll over to the start of the no, hit delete 3 times.
- Hit :i to enter into insert mode, then type yes
- Hit esc to get out of insert mode, then type :wq and hit enter to save the changes.
- Type # grep ‘PermitRootLogin’ /etc/ssh/sshd_config to verify the change was made.
Your best to put a firewall rule on the service console port of your ESX server only allowing access from a few management workstations. I use putty and winSCP to ssh into my ESX Servers. Putty to get to the console and winSCP to transfer ISO images to my NFS share on the NAS.
Wednesday, June 25, 2008
Roaming Profiles... just not in the computer labs - part 2
I just figured out a way to have dynamic roaming profiles. Works perfect with both Active Directory on Windows Server 2003 and AD on Windows Server 2008.
Say we have a user bob. Here are three senarios for bob:
AD Setting: Bob's user account in Active Directory has a the profile path box set to %profilepath%.
Say we have a user bob. Here are three senarios for bob:
- Senario #1: When bob logs into a computer in his office computer we want him to get his roaming profile that has to do with his job.
- Senario #2: When bob logs into a computer in the Computer Sciense department we want him to get his roaming profile that has specific user settings for programming and coding softare.
- Senario #3: When bob logs into a computer in the General Access Computer Labs we want him to get a generic profile optimized for the lab system.
AD Setting: Bob's user account in Active Directory has a the profile path box set to %profilepath%.

- In Senario #1 above, all the computers in bobs department have a System Enviorment variable set of profilepath=\\servershare\profiles\%username%
- In Senario #2 above, all the computers in the Computer Science department have a System Enviorment variable set of profilepath=\\computerscience\profiles\%username%

- In Senario #3 above, all the computers in the General Access Computer Lab are in an OU in Active Directory that have the following Group Policy applied to them: Computer Configuration \ Policies \ Administrative Templates \ System \ User Profiles \ Only allow local user profiles = enabled ). What this does is forces the system to use the default profile on the Lab machine. When we build the image for our lab machines we setup the profile exactly like we want it and then log in with an admin account and using the profile tool under Computer Properties we copy the model profile over the top of the default User folder (hidden folder in documents and settings). Now every user that logs into the lab gets the same experiance. We also use a product called DeepFreeze, that sets the system back to original image state after every reboot.

Tuesday, June 24, 2008
Roaming Profiles... just not in the computer labs.
We recently needed to find a way to allow for roaming profiles with our Active Directory Domain for a certain group of users. This caused a problem for our Computer labs because we didn't want the profiles to roam in the labs as we were wanting every user to get the same experience in the labs and be given the pre-configured profile.
There are 2 options depending on the type of computers you have on your domain in the lab enviorment. Put all the computers in an OU and add a group policy to them. Is under this tree:
(Computer Configuration \ Policies \ Administrative Templates \ System \ User Profiles)
For Windows XP enable the following:
- Only allow local user profiles
For Windows Vista you can change the profile value:
- Set roaming profile path for all users ( you could carfully set it to a local folder)

This works great and allows both the use of roaming profiles in the office environment while still letting the Lab machines be configured for maximum performance. Also, if you use DeepFreeze or a similar product I'd recommend disabling machine password changes through Group Policy so your systems don't suddenly drop off the Domain.
Monday, June 23, 2008
Numbering of VMWare nics
I was surprised to find out after installing VMWare ESX 3.5 on one of our 4 new Dell R900s that the numbering of my nics was dependent on which one we chose to setup up the Service Console on and that the rest of the nics would get an interrupted numbering depending on where nic0 was located. After a little poking around I figured out you can reset this numbering by editing the following file: > /etc/vmware/esx.conf from the command line. I used vi. I also recommend backing this file up (> cp esx.conf esx.conf.bak) before you try editing it because it is essential to ESX.
if you open this file and scroll about half way down you will see the numbering of you nics. Here's what one of mine looked like. You can see that nic0 ended up somewhere in the middle instead of the first port on my on board card like I wanted.
 All you have to do it go through and change the names of the ports to the nic number you want. Save the file and reboot the ESX Server. This is faster than re-installing ESX, especially if you have done any configs on the system.
You can verify your nics by typing: esxcfg-nics –l
Sunday, June 22, 2008
IIS Scripted Site Creation
Management of Microsoft Internet Information Services (IIS) can easily be scripted and even setup as part of automated system. If you look in c:\inetpub\adminscripts\ you will find a utility called adsutil.vbs.
If you run this in a dos command window you can quickly create a virtual directory with a command as simple as:
cscript c:\inetpub\adminscripts\adsutil.vbs CREATE_VDIR w3svc/1/root/
or set the root path for a site with:
cscript c:\inetpub\adminscripts\adsutil.vbs set w3svc/1/root/%1/path "\\sites\users\bob"
I run my automated website creation through some python scripts that kick off dos batch scripts like the sample below. This one below gets the date, creates a log file, mounts the user share, creates the folder if it doesn't exsits, creates the IIS virtual directory and then sets the virtual directory's path to the network share.
Here's the Script (possible wrapping):
---------------------------------------------------
@echo off
rem -------------------------------------------------
rem -- Set %mmdd% varible to the current month_day --
rem -------------------------------------------------
set mmdd=%date:~4,2%_%date:~7,2%
rem -------------------------------------------------
rem -- Set Log File Name / output info to log file --
rem -------------------------------------------------
set myfile=c:\webscripts\DailyLog\WebsiteLog-%mmdd%.txt
echo Creating Folder for %1 >>%myfile%
rem -------------------------------------------------
rem -- Map Drive / Create Folder / Set Permissions --
rem -------------------------------------------------
if exist z:\. goto Mounted
net use z: "\\sites\usershare" >>%myfile%
:Mounted
if exist z:\users\%1 goto Created
mkdir z:\users\%1 >>%myfile%
:Created
echo skip
fileacl z:\users\%1 /G %1:RrRaReWaXWeADcpPWw /D %1:D /s IIS_WEB_USER:RX /PROTECT >>%myfile%
rem -------------------------------------------------
rem -- Create Virtual Dir in IIS / Change its path --
rem -------------------------------------------------
cscript c:\inetpub\adminscripts\adsutil.vbs CREATE_VDIR w3svc/1/root/%1 >>%myfile%
cscript c:\inetpub\adminscripts\adsutil.vbs set w3svc/1/root/%1/path "\\sites\users\"%1 >>%myfile%
---------------------------------------------------
Saturday, June 21, 2008
Recommended Network setup for VMWare ESX
Here's what I recommend for Network setup for VMWare ESX. ESX Servers should have a minimum of 6 network ports, preferably 8. As you can see from the screen shot below I like to configure 3 nics for my VM Network and my Service Console. I put these on the same vSwitch and have the ports configured for vlan trunking (in a 6 port setup I would give this vSwitch 2 nics). I then setup 2 nics for vMotion traffic (this is preferably on a separate network or vlan). I also like to use NFS for my Virtual Machines and so I setup another 3 nics for NFS Traffic. I keep this on a private vlan that has no gateway and have my NetApp NAS on the same private network. This keeps my NFS traffic secure and tight.
Another thing to note here is that each of these vSwitch configuration contains a physical network port located on a different network card and each of those are routed to a different physical switch. The idea here is we get the maximum amount of availability and reliability of the network. You can also run a esxcfg-vswitch -l command from your ESX console to view your configuration.
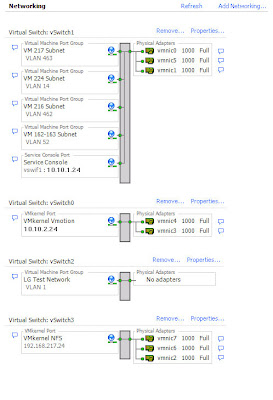
You will also notice I have a vSwitch created with no Physical Adapters in it. I setup this with a vLan ID of 1 and then either add a VM with DNS or manually give all the machines in the group an ip in the same range such as 192.168.0.5 / 255.255.255.0. With this setup, you have to remember to keep all the VM's you want to talk with each other on the same ESX Server so they can talk to each other.
This is a great way to take a copy of a Domain Controller and a few Client systems and put them in a test bubble without having to change anything on the DC besides the networking. I use this setup to test changes to my Domains or web servers without touching the production systems until I've thoroughly tested.
Tuesday, May 20, 2008
NetApp 3040c SAN Cabling Diagram - Typical Fiber Channel
The following is a typical cabling diagram of a NetApp 3040c with 4 fiber channel disk shelves in a single loop configuration. This particular system is also dual connected into 2 fiber channel switches as part of a highly available SAN design. The 3040c Filers in this diagram include (2) additional 4 port fiber channel cards to allow both multiple Fiber Channel networks to connect to the SAN and allow maximum availability of the disks.


Saturday, May 10, 2008
Powerballs - help for carpal tunnel
| Wow, these Powerball things are great. I've been using them for years to help my wrists with Motorsports and golf... but now I've got all the computer guys in the office using them to help with carpal tunnel and sore wrists. The nice thing about them is they are low impact and you can use them while your on the phone or sitting at your desk without any problems. We've been having speed competitions in the cubicles for a change of pace. |
Monday, March 31, 2008
The session setup from the computer %computername% failed to authenticate.
I've been seeing this error come through on my Domain Controller System Event logs for some time now and finally figured out what the cause is. The Error is System Even ID: 5805
Event Type: Error
Event Source: NETLOGON
Event Category: None
Event ID: 5805
Date: 3/30/2008
Time: 10:16:24 PM
User: N/A
Computer: DC1
Description:
The session setup from the computer %computername% failed to authenticate.
The following error occurred:
Access is denied.

My Computers that are connecting to the Domain are Lab Computers for Student Computer Labs. We use a product called Deepfreeze with restores the computers to the last frozen state on every reboot. The one problem with using DeepFreeze and having the computers on the domain is that when the computers try to to a domain machine account password change they will forget the new password after a reboot. Now the computer won't login to the domain or setup a session. I fixed this by adding a group policy to all the Frozen Lab Computers that disables machine account password changes:
It's under Computer Configuration -> Windows Settings -> Security Settings -> Local Policies/Security Options -> Domain Member: Domain Member: Disableachine account password changes

VMWare ESX: Host %esxhost% has no management network redundancy
After my upgrade to ESX 3.5 and Virtual Center 2.5 I started seeing a Cluster Configuration Issue of "Host ESXHost currently has no management network redundancy". Apparently VMWare HA reports a configuration warning when it detects that there is no redundancy for the Service Console. After a little research I discovered that adding another Service Console Port on a different nic would solve the problem. My ESX Boxes have 4 cards in them so this was a pretty easy fix. I have my Host networking setup so vmnic0 and vmnic2 go into switch A and vmnic1 and vmnic3 go into switch B on my network.
Here's what my Network config looked like before the update: And here's what it looks like after the update:
 As you can see... I simply added another Service Console Port on vSwitch2. After adding the additional Service Console Port I also had to reconfigure HA for each ESX Host I made the change on to get the error to go away. I'm still trying to decide if I should create a second VMKernal Port as well.
Here's what my Network config looked like before the update:
 And here's what it looks like after the update:
 As you can see... I simply added another Service Console Port on vSwitch2. After adding the additional Service Console Port I also had to reconfigure HA for each ESX Host I made the change on to get the error to go away. I'm still trying to decide if I should create a second VMKernal Port as well.
Friday, March 28, 2008
VMWare Update Manager - ESX Host upgrade
I recently finished using the VMWare Update Manager to update my ESX Host systems. The process seems to work well but I did run into a few glitches. The first thing I noticed is that if it takes to long to migrate your VM's from the ESX Host you are updating to one of your other hosts the remediate process will time out. (The task can not be canceled and it ends up just hanging at that point). It would be nice if you had more information on what's going on with the task and cancellation points. The first time I ran the update I hit the task hang mentioned above. At this point I really only had two options restart the update manager service or restart the Virtual Center server. I first tried restarting the update manager service. In my case this did not work so I ended up restarting the Virtual Center server. After the reboot the tasks were showing as failed and no longer in progress.
So I decided to manually migrate all my VM's off the host before starting the process. On my first system I also manually put the host in maintenance mode. It took about 25 minutes to complete the process on each of my ESX hosts. One thing that was odd is that my versions didn't seem to change after the update process even though it showed 12 updates installed that were released on 3/12... VC still shows VMWare ESX Server 3.5.0, 64607. (this is what I showed before the updates.)
Overall this is still much easier then having to manually download each of the updates and run them from the console.
Thursday, March 27, 2008
NetApp 3040c Direct Attach VMWare ESX
This isn't documented... but you can actually direct attach you VMWare ESX Servers to the NetApp 3050c / 3040c Filer Systems. Here's my setup. (2) Dell 2950 systems with 2 fiber channel ports each. I have the Dell 2950's directly attached into my NetApp FAS 3040c systems with crossover for failover of the NetApp Cluster. See image below. The green and blue lines represent fiber cables from the ESX Servers to the NetApp Filers. The red and dark blue lines are the fiber cables from the NetApp heads to the DS14Mk4 / DS14Mk2 disk shelves.
 What you do is setup the Fiber Channel to essentially contain a virtual switch. Both adapters 0c and 0d show 3 adapters, 1 online, 1 standby and 1 partner. This will allow the failover in VMWare when you use the cluster failover for maintenance and such.
Slot: 0c
Description: Fibre Channel Target Adapter 0c
Adapter Name: 0c_0
Adapter Type: Local
Status: ONLINE
Adapter Name: 0c_1
Adapter Type: Standby
Status: OFFLINE
Adapter Name: 0c_2
Adapter Type: Partner
Status: ONLINE
Slot: 0d
Description: Fibre Channel Target Adapter 0d
Adapter Name: 0d_0
Adapter Type: Local
Status: ONLINE
Adapter Name: 0d_1
Adapter Type: Standby
Status: OFFLINE
Adapter Name: 0d_2
Adapter Type: Partner
Status: ONLINE
Although this setup will only work for 2 ESX Servers, it can be very useful when you have a limited budget (no need for fiber switches) but need the bandwidth from Fiber Channel. If you are on a serious budget you might want to consider VMWare over NFS with the NetApp.
Tuesday, March 25, 2008
Blackboard on VMWare ESX with Network Appliance
I've been working with our E-Learning Team on designing a new Platform for Blackboard (Blackboard is a learning / course management tool). Our design has concluded with running Blackboard Enterprise on (4) Dell R900 Quad Proc / Quad Core systems with 32gb RAM via VMWare ESX 3.5 connected to a Network Appliance 3040c SAN. We will be running (28) 300 GB fiber channel drives over 4GB fiber for the back end drives. This should provide plenty of disk IO. The High IO apps like our SQL Database VMs will run over Fiber Channel and the smaller systems like QuestionMark will run via VMWare over NFS.
This design, while very new, will provide a very reliable, highly available learning management system. All systems, both Hardware and Apps are configured in some kind of cluster to minimize all single points of failure.
Performance really should be no issue, as the horsepower we can give the Virtual Machines is higher than we were able to dedicate on the old standalone physical systems.
Wednesday, March 5, 2008
Filer Panic - NetApp 3050c - DataOnTap 7.2.3
I was surprised to find an email this morning from my Filers and NetApp support telling me one of my filers had a little panic over the night.
RPANIC:Saving 674M to /etc/crash/core.101185944.2008-03-05.06_16_18.nz ("Protection Fault accessing address 0x0000008c from EIP 0x1426f54 in process FTPPool03 on release NetApp Release 7.2.3") via sparecore
According to the logs and the auto support message it appears that an FTP Error occurred from a poorly written FTP Client that caused the filer to PANIC. This is disturbing. It's saying I can write crappy FTP Software and cause the NetApp Filers to panic. I run my filers in a cluster so during the panic the filer that didn't panic took over the one that did and life went on normally. Now I need to wait until after hours to perform the giveback because already this morning there are over 100 connections via CIFS to the filer and bringing it out of cluster takeover mode requires the cifs service be shutdown and restarted on the partner system.
The Command is easy though: > cf giveback
Panic Message:Protection Fault accessing address 0x0000008c from EIP 0x1426f54 in process FTPPool03 on release NetApp Release 7.2.3
Bug: 264711
Title: disconnecting FTP session during the "LIST" command may panic filer
Description: During a session from an external FTP client to the FTP service running on the storage appliance itself (a service of the Data ONTAP kernel), if the FTP control connection unexpectedly disconnects at the same time the appliance is processing an Passive FTP "LIST" command (or equivalent operation), the appliance may suffer an interruption of service.
Workaround: Correctly written FTP clients on a healthy network are less likely to provoke an abrupt disconnection.
Monday, March 3, 2008
VMWare over NFS vs FiberChannel (FC)
VMWare over NFS has been quite the buzz over the past few months, especially when it comes to NetApp filers like the 3070c. I personally run VMWare over FC connected into a NetApp 3050c on hi-speed fiber channel drives. What I like about it is it's fast and it works well. It's really not that hard to setup and a denial of service attack on my IP network won't hurt my VM's access to the SAN.
With Fiber channel you have to create LUNs for the VMWare box to access. There are 2 schools of though here... either create 1 big LUN and run all your VM's from it - or - create a new LUN for each VM.
With NFS, things change. Apparently you can take advantage of de-duplication, no single disk I/O, and you can use VMDK thin provisioning. What I'd like to see is a good white paper on NFS vs Fiber Channel including setup instructions and why you would choose one over the other.
Tuesday, January 8, 2008
VMWare ESX 3.0.2 upgrade to VMWare ESX 3.5
I recently upgraded VMWare ESX 3.0.2 to the newest version ESX 3.5. I always upgrade using the full CD ISO downloaded from the VMWare support site. I had problems in the past using the .tar versions. The upgrade went very smoothly and took about 20-25 minutes with minor testing.
Here's my process:
Another really cool part to this is the ability to upgrade your ESX Hosts directly from Virtual Center and apply patches.
Way to go VMWare.
Here's my process:
- Move all VM's onto 2nd ESX Host
- PUT ESX Host into Maintenance mode
- Reboot ESX Host with Image CD in it (Ghost)
- Get a Image of the system
- Reboot ESX Host with upgrade / install CD in it
- Go through the upgrade using the default options (if doing upgrade the defaults are what you set when you did the inital install)
- Reboot ESX Host
- I then check a couple files to make sure my custom changes didn't get overwritten. 2 of my changes are: take out the hda= link int he grub.conf to fix my CD/DVD Drive and I enable ssh for my management system.
- Via Virtual Center bring the newly upgraded ESX host out of maintenence mode.
- start up a test VM on the new ESX Host and run some tests / network tests on it.
- migrate a second running test VM from the production ESX Host to the newly upgraded ESX Host... again perform tests / network tests to verify it's running ok.
- slowly migrate production VM's over.
Another really cool part to this is the ability to upgrade your ESX Hosts directly from Virtual Center and apply patches.
Way to go VMWare.
Subscribe to:
Posts (Atom)